

What Does Failed To Connect To Windows Service Mean
Group policies are settings pushed into a reckoner'southward registry to configure security settings and other operational behaviors. Group policies can be pushed down from Active Directory (actually, they're pulled downwards by the client) or by configuring local group policy.
Some users have reported seeing an fault message in their reckoner's Notification Panel that has the heading "Failed to connect to a Windows service" and states, "Windows could not connect to the Grouping Policy Client service. This problem prevents standard users from logging on to the system. Equally an authoritative user, you tin can review the Arrangement Event log for details about why the service didn't respond."

The possible causes of the "Failed to connect to a Windows service" error bulletin
This error arises when a estimator crashes afterward the rebooting process during Windows Updates. The computer restarts after the crash and reports an unexpected shutdown during Windows Updates. Right later on this, it starts displaying this error message. In nigh cases, this error message is given birth to by the loss of of import Registry settings required to initialize the Group Policy Client service.
How to go rid of the "Failed to connect to a Windows service" error message
If you are suffering from this problem and are trying to get rid of it, y'all should, offset and foremost, endeavor to repair and restore Windows service components. You lot tin do so by merely downloading and running Restoro to scan for and repair corrupt and missing repositories from here
However, if trying to repair and restore Windows service components using Restorodoesn't work, fearfulness not equally there are quite a few other highly effective solutions that can be used to attempt and resolve this problem. The post-obit are the well-nigh effective solutions that you can use to attempt and fix this issue:
Solution 1: Fix this problem using the Registry Editor
Press the Windows Logo key + R to open a Run dialog, blazon regedit into the Run dialog and click on OK. Doing so will launch the Registry Editor.

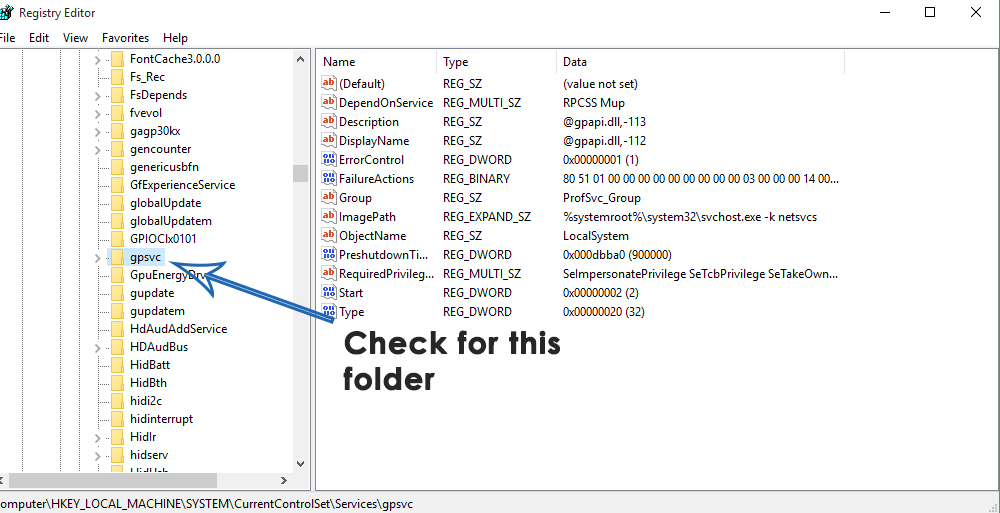
In the left pane of the Registry Editor, navigate to the directory described beneath and check to see whether or not a binder named gpsvc is present. This folder is responsible for service configuration and parameters. In nigh all cases, it volition be nowadays.HKEY_LOCAL_MACHINE > Organization > CurrentControlSet > Services
If gpsvc is present, then navigate to the directory described below in the left pane of the Registry Editor. This is an extremely important and delicate directory so make sure that you don't bear upon anything else.
HKEY_LOCAL_MACHINE > SOFTWARE > Microsoft > Windows NT > CurrentVersion > SvcHost
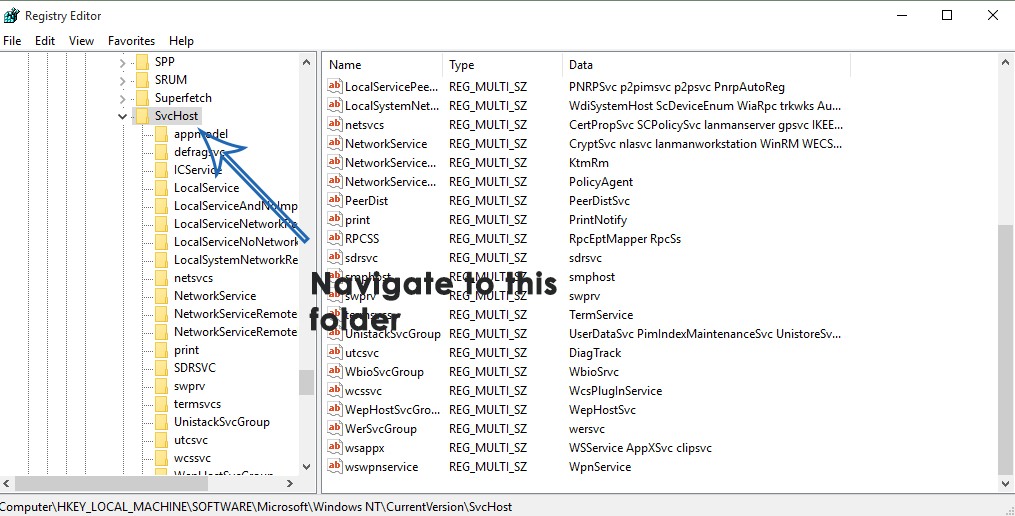
Inside the SvcHost folder, there must be some keys and values which are required for the procedure to be completed. Bank check for a multi-string value GPSvsGroup inside SvcHost. If it is not present, you lot are going to have to create information technology yourself. In society to create the multi-string value, right-click on the SvcHost folder, hover over New and click on Multi-String Value.
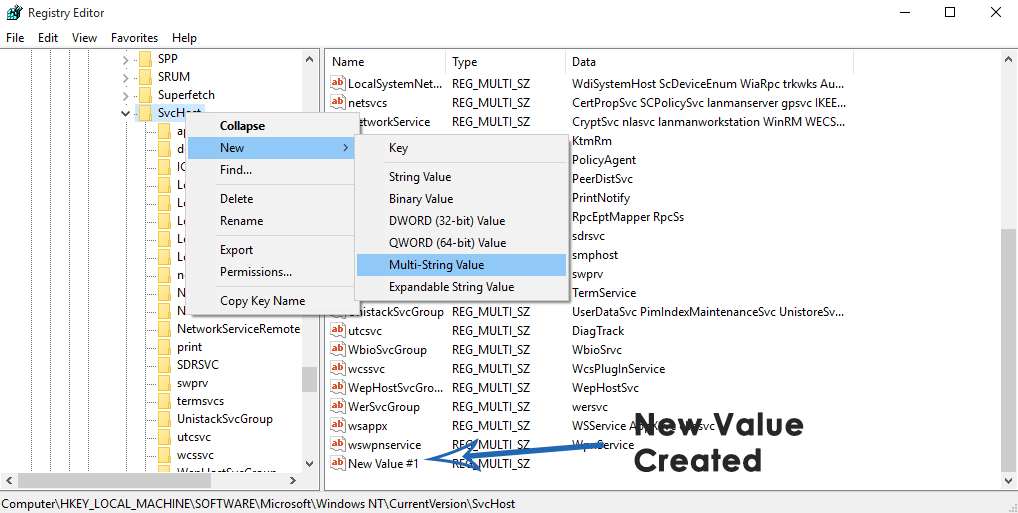
Doing so will create a new registry value in the right pane. Rename the new multi-string value GPSvcGroup past correct-clicking it, clicking on Rename, typing in GPSvcGroup and pressing Enter. Now, double click on the GPSvcGroup value to modify information technology, replace whatever is in the Value data field with GPSvc and click on OK.
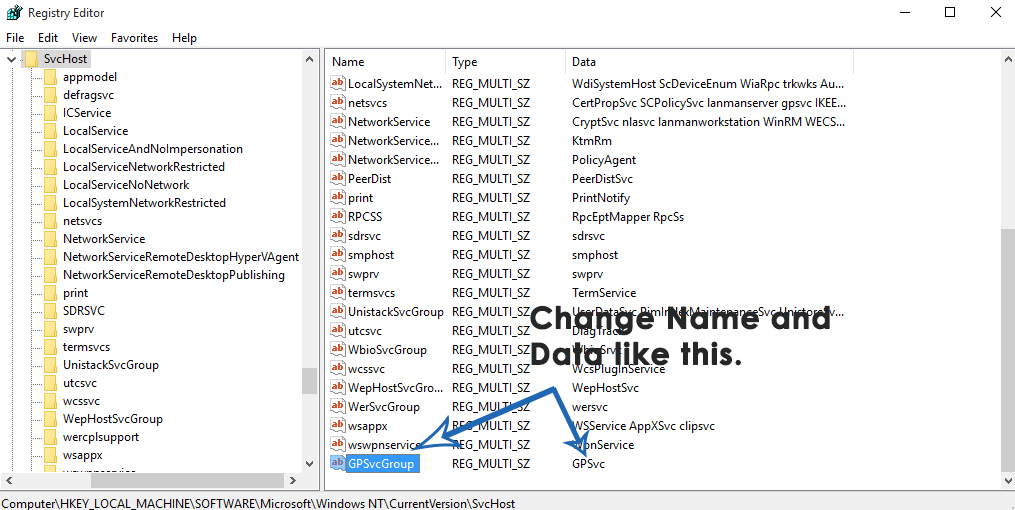
The next matter you might need to do is to create a new folder (key) within SvcHost. To do so, right-click on SvcHost in the left pane, hover over New and click on Key. Rename the new registry fundamental GPSvcGroup.
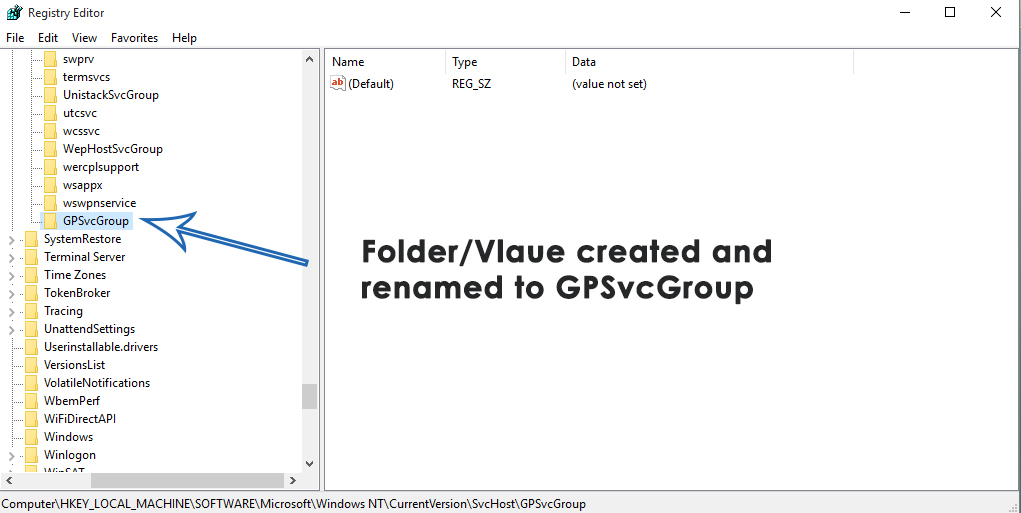
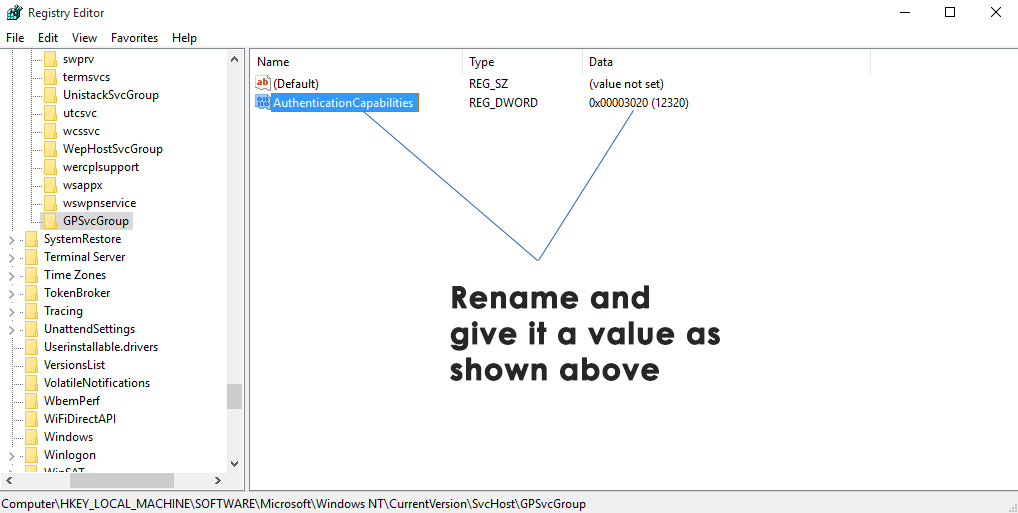
Click on the GPSvcGroup key in the left pane to have its contents displayed in the right pane. You at present need to create 2 new DWORD (32-bit) values in the right pane of GPSvcGroup To do so, right-click on an empty infinite in the correct pane, hover over New and click on DWORD (32-bit) Value. This procedure needs to be repeated ii times to create a total of 2 new DWORD (32-scrap) values.
The first value needs to be renamed AuthenticationCapabilities and should have 12320 as its Value data and Decimal as its base.
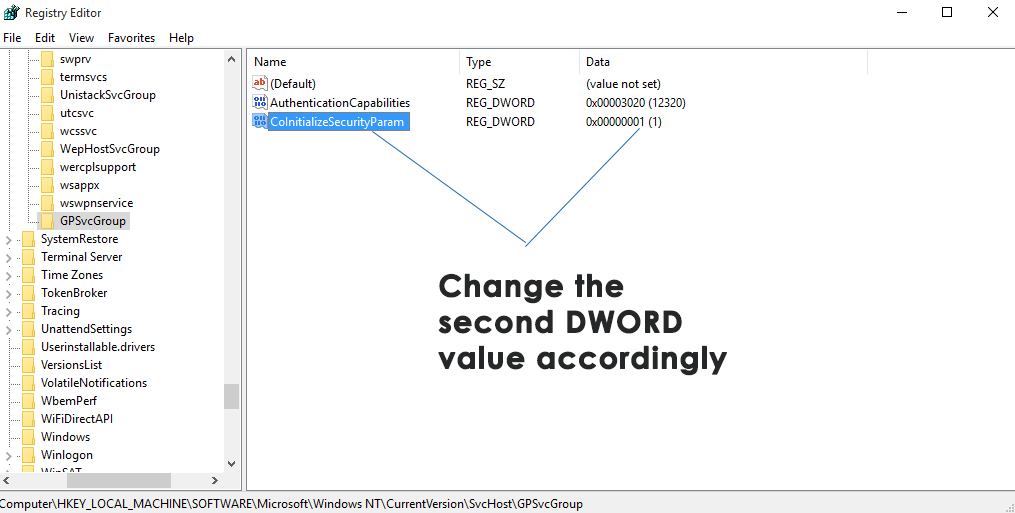
The second value needs to be renamed CoInitializeSecurityParam and should have 1 as its Value data and Decimal as its base.
Close the Registry Editor.
Restart the computer and bank check to see whether or not the problem yet persists once information technology boots up.
Solution 2: Try clean booting the afflicted figurer
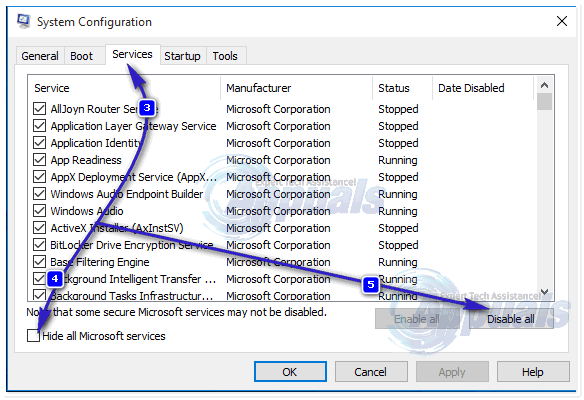
- Press the Windows Logo key + R to open a Run dialog.Type msconfig into the Run dialog and click on OK.

- Navigate to the Services tab, enable the Hide all Microsoft services by checking the box beside it and click on Disable all.
-
 Next, switch to the Startup tab and disable all start-upwards services. If you are using Windows 8/viii.1 or 10, you are going to accept to click on Open Task Manager when you get to the Startup tab and, ane by one, right-click on the proper name of each of the applications listed and click on Disable in the context menu in order to practice so. You can re-enable the applications later using the same procedure, merely you should only re-enable apps that are actually needed.
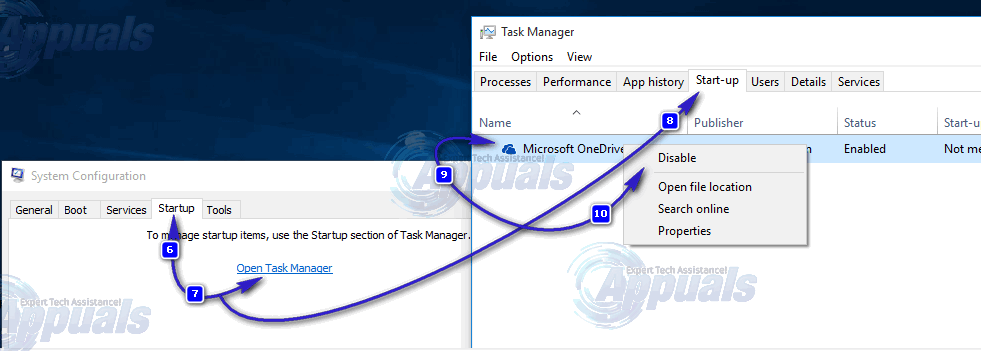
- Restart the PC and check to see if the problem persists once it boots upwardly.
Solution 3: Reset the affected computer'south Winsock itemize
For some reason, many users affected by this upshot take been able to go rid of information technology by simply resetting their computers' Winsock catalogs. In order to reset a Windows reckoner's Winsock catalog, you lot need to:
- Open the Showtime Card.
- Search for "cmd".
- Right-click on the search result titled cmd and click on Run every bit administrator. Doing so volition launch an elevated Command Prompt.
- Blazon the following into the elevated Command Prompt and press Enter:
netsh winsock reset
- In one case the command has been fully executed, shut the elevated Command Prompt.
- Restart the estimator. Check to see whether or non resetting the figurer'due south Winsock catalog did the trick once it boots up.
Solution 4: Permit Full Command of all relevant registry keys to Administrators using the Registry Editor
- Press the Windows Logo key + R to open a Run
- Blazon regedit into the Run dialog and press Enter to launch the Registry Editor.
- In the left pane of the Registry Editor, navigate to the following directory:
HKEY_LOCAL_MACHINE > SYSTEM > CurrentControlSet > services
- In the left pane of the Registry Editor, right-click on the gpsvc sub-central nether the services primal and click on Permissions… in the context carte du jour.
- Click on Advanced.
- Navigate to the Owner
- Under the Change possessor to: section, click on Administrators to select it, enable the Supercede owner on subcontainers and objects choice by checking the box beside information technology, click on Utilise and and then click on OK.
- Repeat steps 4–5.
- Click on Administrators to select it and click on Edit….
- Check the Allow box direct in front end of Full Control and click on OK.
- Enable the Replace all kid object permissions with inheritable permissions from this object option by checking the box abreast information technology.
- Click on Apply so on OK.
- Click on Employ and then on OK, merely this time in the Permissions for gpsvc
- Download the default configuration of the gpsvc registry key for the version of Windows that the afflicted computer is running on:
Windows Vista
Windows vii
Windows 8/eight.1
- Now, back in the Registry Editor, click on File > Import….
- In the Import Registry File dialog, navigate to where the registry file y'all downloaded in footstep xiv is located, click on the registry file to select it and click on Open.
- You may be asked to confirm the import of the registry file or the merging of it with the affected computer's registry, and so be sure to confirm the activity.
- In one case the downloaded registry file has been successfully imported and merged with the calculator's registry, restart the computer then check to see whether or non the issue has been stock-still when information technology boots up.
Solution v: Plow Fast Startup off (for afflicted Windows 10 computers only)
Many users affected past this problem who take computers running on Windows 10 have had success with fixing this issue by turning off Fast Startup, a characteristic designed to allow Windows 10 computers to kicking up faster just a characteristic that, in many cases, ends upward becoming more than of a nuisance than a approving. In such cases, disabling Fast Startup has been able to prepare this outcome. The following are the two ways you lot can go about disabling Fast Startup:
Method 1
- Correct-click on the Start Card push button to open the WinX Menu.
- Click on Power Options.
- Click on Cull what the power buttons do in the right pane of the window.
- Click on Modify settings that are currently unavailable.
- Uncheck the checkbox abreast Plow on Fast Startup (recommended), thus disabling it.
- Click on Salvage changes.
- Restart the calculator.
Method 2
The 2d method that can be used to disable Fast Startup is to simply disable the Hibernate feature, deleting the hiberfile and disabling Fast Startup as a issue. You should use this method if Method 1 doesn't work or if you simply want to disable Fast Startup and gain a scrap of disk infinite (the hiberfile takes up as much disk infinite as the amount of RAM your computer has) at the same time, although it should exist noted that using this method will also result in the loss of the Hibernate characteristic.
- Correct-click on the Start Menu push button to open the WinX Menu.
- Click on Control Prompt (Admin) to launch an elevated Command Prompt.
- Type the post-obit into the elevated Control Prompt and then press Enter:
powercfg -h off
- Shut the elevated Command Prompt.
- Restart the computer.
Once yous have used your preferred method to disable Fast Startup, you should no longer be seeing the "Failed to connect to a Windows service" error bulletin on your Windows x computer.
Solution 6: Manually create registry keys and registry values
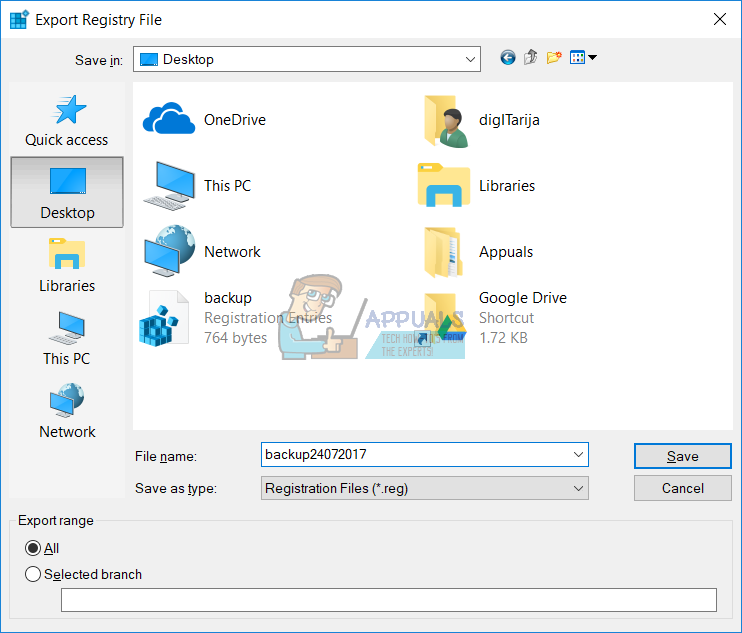
Before you do any registry configuration, we are recommending you lot to backup registry database. Why you need to practise registry fill-in? In example of some misconfiguration, you can revert registry database to previous state when everything worked without new problems.
- Hold Windows logo and blazon regedit
- Right click on regedit and at choose Run as administrator

- Click Yes to confirm running regedit every bit Administrator
- Click File and and then ..

- Blazon File name, in our case backup24072017, under Export range select All and click Save
- Navigate to following location:
HKEY_LOCAL_MACHINE\SOFTWARE\Microsoft\Windows NT\CurrentVersion\Svchost
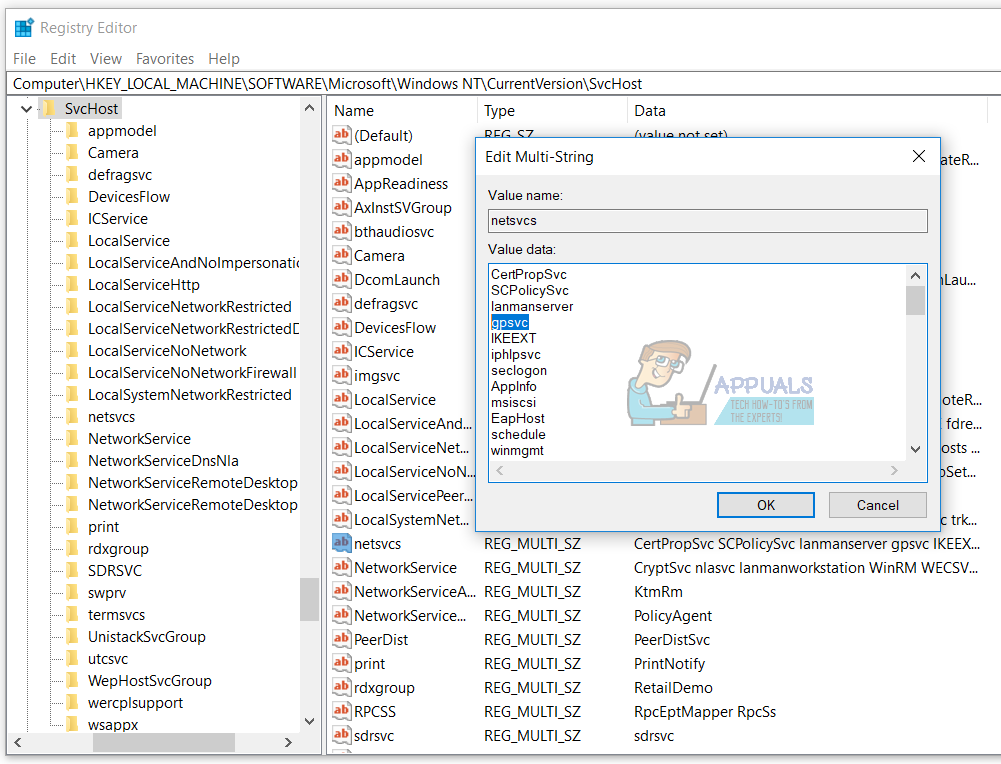
- On the correct side you will run across different value data. You need to select netsvcs
- Right click on netsvcs and then click Modify
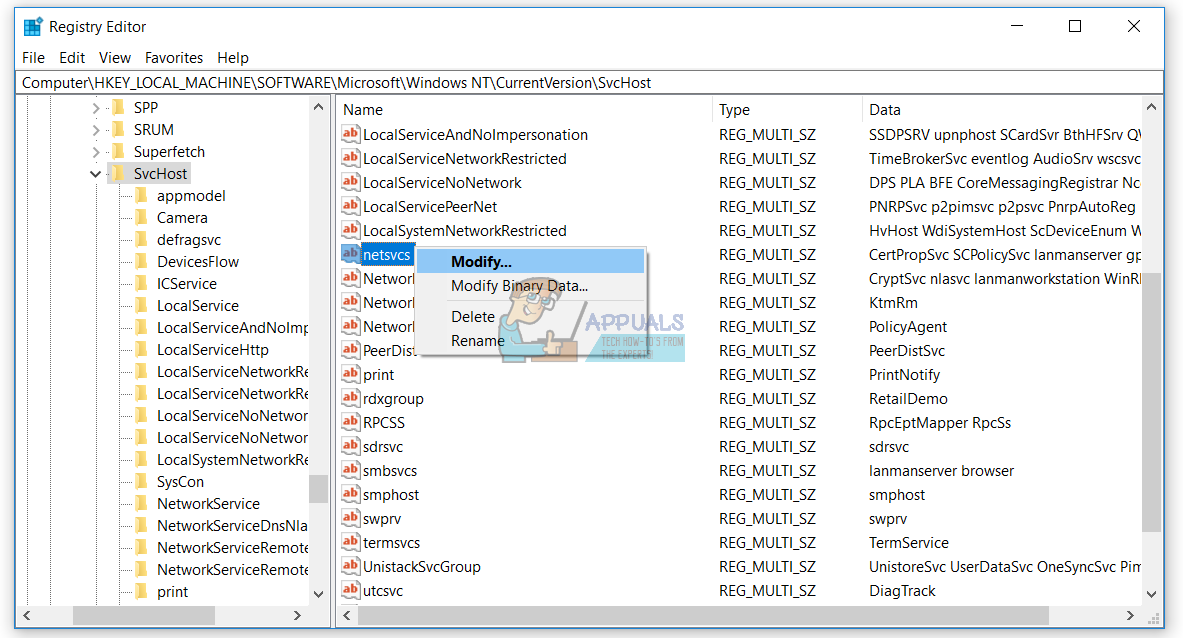
- In side by side window you lot will see that gpvsc is missing. You volition need to click at the end of 1 value data and press Enter, to write gpvsc, as shown in adjacent image.

- Click OK
- Right click on Svchost and so choose New and click Key

- Type netsvcs and press Enter

- Right clicm on white window background, and choose New, and and so click DWORD (32-bit) Value, regardless you lot are using 32-fleck operating system or 64-bit operating arrangement.
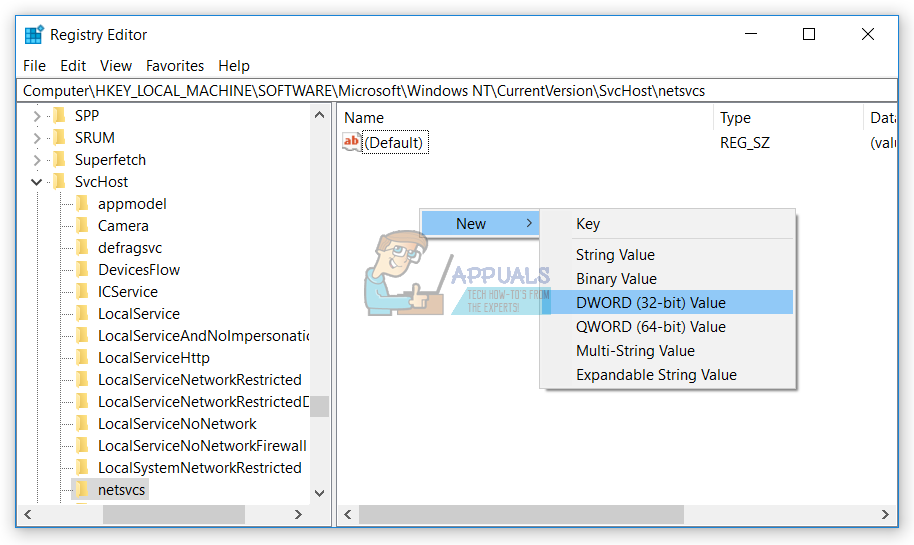
- Type name CoInitializeSecurityParam and press Enter
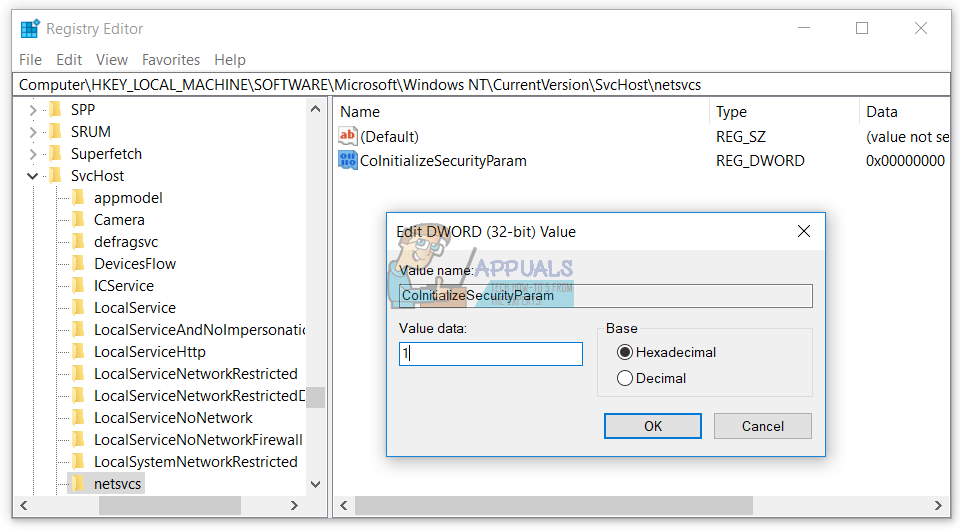
- Right click on CoInitializeSecurityParam and choose Modify
- Change value to 1 and click OK
- Right clicone thousand on white window background, choose New, and so click DWORD (32-bit) Value, regardless yous are using 32-bit operating system or 64-bit operating system
- Type name CoInitializeSecurityAllowLowBox and press Enter
- Right click on CoInitializeSecurityAllowLowBox and choose Modify
- Alter value to i and click OK
- Right click on white window background, choose New, and then click DWORD (32-bit) Value, regardless you lot are using 32-bit operating system or 64-bit operating system
- Type name AuthenticationCapabilities and press Enter
- Right click on AuthenticationCapabilitiesand choose Modify
- Alter value to 3020 and click OK

- Restart your Windows
- Hold Windows logo and press R
- Blazon services. msc and press Enter
- Navigate to service names Group Policy Customer and check is it running. If information technology is running, you successfully solved your trouble.
Solution 7: Starting System Event Notification Service
It is possible that the System Outcome Notification Service has been disabled which can result in triggering this error. Therefore, in this step, nosotros will be enabling and starting the Arrangement Consequence Notification Service. For that:
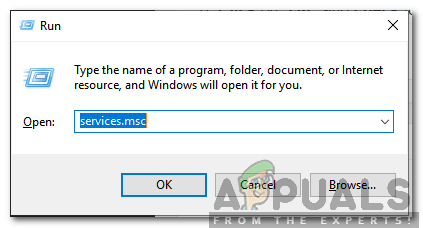
- Printing "Windows" + "R" keys simultaneously to open up the Run prompt.
- Blazon in "services.msc" and press "Enter".
Typing in "Services.msc" and pressing Enter - Locate the "System Issue Notification Service" and double click on information technology.
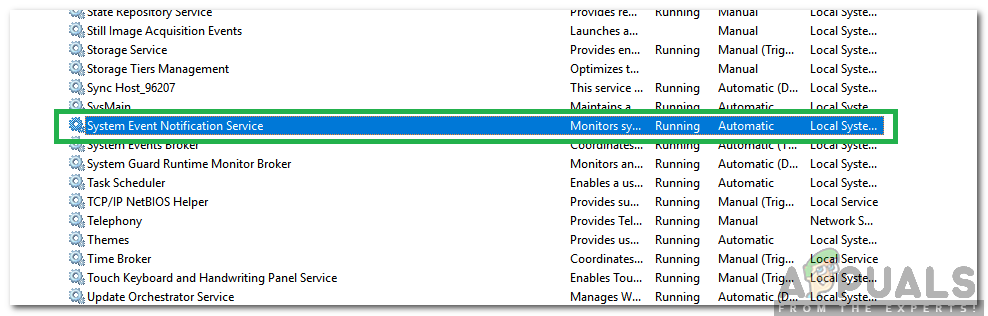
Double-clicking on the "Organization Effect Notification Service" - Click on the "Startup Type" dropdown and select "Automatic".
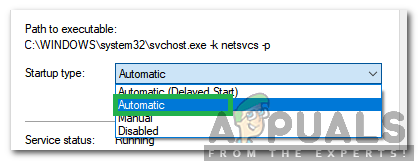
Selecting Automatic - Click on the "Offset" option and click on "Employ".
- Click on "OK" and check to run into if the outcome persists.
![]()

Source: https://appuals.com/failed-to-connect-to-windows-service/
Posted by: arnoldfigother.blogspot.com
0 Response to "What Does Failed To Connect To Windows Service Mean"
Post a Comment